I really like this visual representation of the phrase created in After Effects. This shows perfectly how typography can be used to communicate the meaning of words, which is something that I need to aim to achieve in my work. I will look at ways in which I can use the type to communicate the meaning of the words.
Tuesday, 1 December 2009
Batteries not Included - Motion Graphics
That's My King! Typography Film
That's My King! from Albert Martin on Vimeo.
I like the way that the maker of this film has included some other graphics and also some video into the piece. The way that the video pieces freeze and become stylised graphics looks really effective. The video over all is stylised to look like an old scroll, communicating the fact that it is talking about biblical subjects, I want to stylise my video in a similar way using the sepia like tones and black text and graphics as I am wanting to communicate a similar thing.
Tick Tick Boom Motion Graphics
The maker of this Typography Motion Graphics short film uses the movement of the text to represent it's sound. For instance it blurs and snaps to place, representing the loud, almost shouting way that the singer sings. The camera is also rotated at the end of some of the song lines, showing the distinction between the lines. In my piece I will want to find ways to represent both the sound of the song and the words being sung through my graphics.
The creator of this piece has probably used either After Effects of Motion to create this piece. The text will have been created in the program and key frames used to animate it. The camera has also been animated using key frames to create movement and rotation. The items and camera are moved in the canvas and then a key frame added to create movement, the tweening is done automatically in the programs.
animation research
This is the music video for "Hey". The action follows the music and goes with the flow of the phrases within the music. Events such as crashing through floors etc coincide with a drum beat or certain guitar riffs.
The animation seems to have been produced via CGI, perhaps using a program such as Lightwave or Maya. It has more of a grungy feel then CGI can tend to, this has been achieved through texture and use of colour, rather then using bright, child like colours that CGI is often associated with in animation. I prefer this asI am not
I really like the grungy feel of this animation. It suits the style of music well. The use of textures and also cardboard as the material helps to achieve this.
All The Tears
Gojira | MySpace Music Videos
Although i generally like the actual animation of this piece I feel that it hasn't been edited to the music very well. The action of the animation should have been edited to the beat more to make it feel as though it is part of the music, it just doesn't really gel, they feel like two separate entities that just happen to have been placed together. In my piece I will make sure that I edit it to the music more professionally.
I really like the idea behind this, using everyday objects and giving them a different purpose and meaning. The message behind the animation is about western culture and what we value. The objects chosen work really well in this, and I feel that it is something that I would like to try doing.
I really like the idea of animating a human body as in this piece. It's experimental and different, which is what I would like to aim for in my piece. I also like the way that the frame rate is reduced, making it look like an animation (although slower) but still giving the feeling of motion. This is something that I could have a look at doing, or animating at a standard rate.
This animation actually gave me the idea to use barcodes to animate with. It lead to me putting together a narrative based on the idea of the beginning of the end of the world and trying to resist the mark of the beast.
Again this animation uses the human body to animate with. I like the fact that they have tried something different and turned the human body into a skateboard, seemingly achieving the impossible. The sound in this animation really enhances the action, it is realistic and changes in the right places i.e at jumps it sounds like the skate board has been lifted into the air and landed again.
Typography tutorials
http://ae.tutsplus.com/tutorials/motion-graphics/design-rhythmic-motion-typography-in-after-effects/
For my Digital Storytelling project I want to create typographical motion graphics short film. I found the tutorial above to help give me ideas. The movement in the graphics needs to represent some aspect of the sound or the story, for instance important words may be bigger and functional words (and, it etc) made smaller to represent their relative insignificance.
http://www.kenstone.net/fcp_homepage/motion_working_keyframes1_spencer.html
As after effects isn't available for me to use I have taught myself how to use Motion, part of the Final Cut Pro package. Although I have worked most things out how to create a key frame was not immediately apparent so I used the tutorial above to learn how to use them in the program.
Sunday, 22 November 2009
Old Poets

Ok so this is really just a test for mobile blogging as my new phone comes with the ability to post to Blogger. However this is a really cool pub in Ashover called The Old Poets Corner. If only i lived nearer I could come sit and do college work here.
Tuesday, 10 November 2009
Monday, 9 November 2009
Animation Test
In this first test I mostly looked at the animation of the handle. I have used 24 frames per second but recorded in 2's. I feel that this creates a smooth movement for the handle and works well.
Testing animation
In this test I wanted to see how the box could animate. As I was unable to stiffen the hinges enough for the lid to hold itself up I had to reposition the camera angle to hide the back of the box where I was going to hold the lid to animate it.
Animation process.
I am doing a 3D stop motion animation and have made a jack in the box and have bought a victorian clown like doll and spinning top to use. I have also built myself a set using a box, wallpaper and some carpet.

To create the actual animation I used iStop Motion moving the box, doll etc a little at a time and pressing space bar to get the camera to take a new shot.
The handle on the box was held in place with a disc of wood on the inside and some tape so that it could be stopped in any position.
When I had animated using iStop Motion I exported the video as a quick time movie.
I imported the music to Final Cut Pro. I had edited this at home using the Audacity music editing program. I wanted to create a surreal a creepy feel with my animation and so eidted my music ot help create this effect. I slowed the music down a little, to make it "hang" in the air as it goes along, almost as if it was struggling to play through the note and onto the next. I then copied the track and placed it in a new track. I reversed this and slowed it down. This creates a very surreal feeling to the sound as it plays backwards as well as forwards.
After that the animation was loaded into final cut pro where I edited it. I used scale and keyframes so that I could crop the footage where my hand was visible animating. I also used this to make sure that my close ups were well composed.

I then used filters to desaturate the image. I allowed a very small amount of colour to come through into the video. This gives it a timeless quality, and also make it quite surreal.

I then altered the brightness and contrast of the video to enhance the visuals and really create the surreal feeling to the animation.
I then used the text tool to add the credits at the end. I used the cross fade video transition to makes this made in and then out, to give a smooth, professional feel to the end of the animation.


I then used the text tool to add the credits at the end. I used the cross fade video transition to makes this made in and then out, to give a smooth, professional feel to the end of the animation.
Second Animatic
I made this second animatic to get a better idea of what the animation is going to look like, without going to the effort and expense of producing the fully formed and edited animation.
After producing this I realised that I didn't like the last shot in the animation =, looking head onto the box again. I don't feel that it work or fits in with the animation at this point. I decided to remove this before producing the final edited animation. I also decided that I needed to make sure that I was using a close up on the doll as the box opens, to really focus attention on this.
First Animatic
I created this animatic by adding some extra frames into my storyboard. This allowed me to start planning the timings of the animation and also a better look at the shots I would use.
Digital Storyteling Design Process.
I have already posted how I edited the photographs.
I imported my photographs and sound material into Final Cut Pro. And then dragged my story mp3 into the time line. I listened to this through and cut it in the parts where I needed pauses.
I then started to drag the photographs into the time, I opened them up in the viewer first so that I could set the time for each of them. I then dragged them to the time line. I could then drag the photograph out from here if I wanted to make it last longer or shorter.


After adding all of the photographs I then added the other sound material I had got to the time line. This was background traffic noise and the sound of splashing in puddles. I then placed this in the appropriate position on the time line. I then cut some of the background noise from the recording of the story and copied this through the time line to the places where the story have been paused. This creates a feel of continuation with the story rather then making it seem that it stops and starts.
Sunday, 8 November 2009
Digital Sotry telling - evaltuation
What were you asked to do? (Project brief tasks)
I was required to create a digital story in a similar style to that of Chris Marker's La Jetee. The film was to last between 5 and 10 minutes. The theme was family mythology and I needed to look into different stories that could be told from my family.
What did you make/present?
I made a photo montage film based on a story about me dropping a packet of chocolate buttons in the road as a child. The buttons were ran over and we had to get another pack. I took photos and recorded sound to use for this.
What did you want to communicate?
The main thing to communicate was the plot line for the story. I needed to represent the different sections of the story that gives it's structure and sense. I wanted to show the story through the child's eye by taking photographs from a low angle. This will allow the viewer to view the events through a more child like perspective.
Who was your intended audience?
My intended audience is my family. I found in research how story telling is used to help create a sense of identity, however these stories are fluid and change fro telling to telling. I have created a digital story that will tell the same thing every time. This means that there is a set basis for identity to be based around rather then a changing story. The video can be shown for many years to come, within the current nuclear family and to children and grandchildren to communicate that sense of the family identity. The story is fairly simple and told in a way that is suitable for all ages. This means that it can be shown to children to help create this sense of identity at the crucial stage for this.
What materials and processes did you experiment with?
I made a digital collage by scanning in photograph, textures and other images that I found. These were then compile in Photoshop.
I also used Photoshop to change the saturation of photographs and use pin light blending mode to allow colour to come through from a duplicate layer. This helped to give a sense of a rainy day to the photographs.
I used traditional collage, cutting up text and sticking it back down to create my title. This gives a child like, hand made feeling to the title - communicating that the story is about a child and the photographs are mostly take from a child's point of view.
What materials and processes did you reject?
I didn't use digital collage in my final. I wanted to communicate my story through a series of photographs, making the event seem more real to an audience. Using collage would have disrupted this, and therefore I decided not to use the process.
What materials and processes did you use in your final designs?
I used Photoshop to edit my photographs to make them seem more like a rainy day as they had been taken on a bright, sunny day.
I also used traditional collage to create my title. To communicate it being child like and hand made.
How do the materials you chose to use help you to communicate your message to your audience?
By editing the photographs I more successfully communicated the rainy day. If I hadn't done this my photographs would not have fitted in with the story. My use of photography helps to make the story seem like a real even, rather then using other techniques such as illustration etc that may have taken this away from the story.
What did you do to ensure you worked with tools and materials safely?
I made sure that I had no food or drinks around the computers and that I took regular breaks from the computer screen. I made sure that the camera was protected when taking photographs splashing in the puddles. I used the long zoom to help achieve this. When taking photos by roads I made sure I was a safe distance from traffic on the pavement. I made sure that I attained model release forms for my models to prove that I had the right to use the photographs.
How well did you manage your time?
Although my time management could improve I feel that I have done better on this project then previous ones. I had gotten more work done early on on then before. My main issue at the minute is balancing all the areas of my life as with college, work and church commitments I am finding it hard to find time to relax and have fun - running the risk of burn out. I am trying to address this. I have started to use a timetable that I have created for myself to plan my college work and other activities for the week around work, college and church.
What were your strengths in completing this project?
I have used Final Cur Pro before and find that I Take to the program fairly easily. This meant that I didn't have to worry about controlling the program and could work on the creative side of the design.
What would you like to have done differently?
I would firstly like to try and balance my commitments more effectively. I would also have liked to put some more work into the development stage of the design process.
What will you do to ensure you improve for the next project?
Next time I will make sure that I balance these areas of my life more effectively and put more effort into the design development side of the project to ensure I can achieve the best grade possible.
Friday, 6 November 2009
Thursday, 5 November 2009
Animation evaluation
What were you asked to do? (Project brief tasks)
What materials and processes did you experiment with?
I also learnt many new techniques in final cut pro - using key frames to pan, zoom and scale the video. I also learnt how to skew and play video's within other visuals. I am not going to use the latter technique, it doesn't fit in with the style that I am looking for in my animation. However I have used the scale tool to zoom in on my animation.
I made the jack in the box with the help of Gary the 3D workshop technician. I then painted this to fit my style.
I used gardening wire to create an armature in my doll so that it could be animated more easily.
What did you do to ensure you worked with tools and materials safely?
How well did you manage your time?
What were your strengths in completing this project?
What will you do to ensure you improve for the next project?
I will create a better quality animatic first time, using photographs if I am creating a 3D stop motion again. I will also put more time into editing around class times as there is not enough time to get tests and final animations done just in the lesson times.
Evaluation for web design.
What were you asked to do? (Project brief tasks)
What did you make/present?
What did you want to communicate?
I also want to communicate professionalism and ma capability at design. This means that my website must be well designed and that the work I choose to showcase needs to be the best quality work that I have produced.
I also wanted to show how I work - digitally whilst using traditional techniques to enhance and texture my work, therefore my website needs to represent this.
Who was your intended audience?
What materials and processes did you experiment with?
What materials and processes did you reject?
What materials and processes did you use in your final designs?
How do the materials you chose to use help you to communicate your message to your audience?
The grungy texture communicates this part of my personality and my work. This is then balanced off with the colourful links which communicates the other side of my work and personality. The work showcased on the web site then backs this up as you can see both the darker, grungy pieces and those that are more colourful.
What did you do to ensure you worked with tools and materials safely?
I made sure that I had no food or drinks around the computers and that I took regular breaks from the computer screen. When tea staining the paper I did this in an area away from computers and electronic equipment.
How well did you manage your time?
Although my time management could improve I feel that I have done better on this project then previous ones. I had gotten more work done earlier on then before. My main issue at the minute is balancing all the areas of my life as with college, work and church commitments I am finding it hard to find time to relax and have fun - running the risk of burn out. I am trying to address this. I have started to use a timetable that I have created for myself to plan my college work and other activities for the week around work, college and church.
What were your strengths in completing this project?
What would you like to have done differently?
What will you do to ensure you improve for the next project?
Next time I will make sure that I balance these areas of my life more effectively and put more effort into the design development side of the project to ensure I can achieve the best grade possible.
Wednesday, 4 November 2009
Website Step-by-step.


After creating the CSS styles I clicked on the cell and set the style in the properties panel. I also used CSS to set my font and font colour. I chose Arial as it is simple and professional it is also easy to read for users of the website. It has also been used in my work and so represents this.
I then set up the navigation. I clicked on the slice that I wanted to link and used the property panel to set the link.

I wanted the link to my blog to open in a new window, so that users won't have to leave the website to view it, meaning they are more likely to continue using the website after going to look at the blog.

I created a new table in the cell containing my background so that I was able to type my text above the place holder. I aligned this central to get my text to sit nicely in the place holder.


To create my "work" - portfolio page I inserted a table with one column and 7 rows. I then merged cells where necessary and typed the category titles. I then inserted the thumbnails I had created in Photoshop for the pieces of work that I want on my website. I then linked the image based pieces of works to the file containing the larger - full version of the piece of work.

I want the full versions of my work to open within my webpage rather then on a new webpage. This is more professional and integrated. It is easier for the user as they don't have to either leave the page or end up with extra windows to close back down again. To achieve this I downloaded the files for the lightbox javascript application. I had used this in the past and knew it was capable of what I wanted to achieve. I put the relevant files and directories in the directory for my website.
The following script is added in the tag of the HTML document to link the javascript and CSS files to it.

I then edited the code for each of my linked images as follows:

I made the page for my VJ piece video. I used the same background as the other pages for this, but exported it as a single image and used it as the page background file. I had uploaded my video to Youtube and used the embedding code from there to input it into a table on the document. I again used CSS to position this. This allowed me to get the content to sit centered on the page, which looks more professional and generally makes the composition more pleasing to the eye.
I wanted to get the video to open i a new window on my website as this is more professional then sending people to Youtube to watch it. It also means that people are staying within my site and are more likely to continue using it then if I sent them to an external website.
I then used the code:
javascript:window.close()In the link for Close Window, this will close the window when the user clicks it, allowing the user to return to the work page of my website.

I created a hotspot over the thumbnail for the video.


I then repeated the last two steps to open up my flash campaign for knife crime. I had embedded this in a HTML file before for an older version of my website.
I wanted to create a scrollbar for the content holder on the about page as I wanted to input more information without affecting the overall layout of the page. I wanted to retain the free space and subtle composition. To do this I included the following code into the cell. I had to change the amount of pixels a few times to get the scroll bar to fill the content holder properly. I then typed all the information I wanted into this.

Again I used lightbox to open up larger versions of images I wanted on my webpage.

I then used an on-line service to create a favicon for my website. I used an small selection of the source material I had used. I chose an interesting looking selection, with detail. This was then placed in the file directory to be displayed in browsers when my website loads. I wanted to have a favicon as it is more profesional and gives the website an identity if people save it to their favourites - they will see the icon and imediatly know it is for my website. It communicates that I have considered the design of my website and that I understand web design to universities and potential clients or employers.
My website can be found at www.james-lock.co.uk
Tuesday, 3 November 2009
As I was unable to get sound recording of a child splashing in puddles. There was too much background noise when I was taking photos of my model. I have downloaded an mp3 of this youtube video. I will use this in a short section of my film to enhance the section that shows teh character splashing.
Sunday, 1 November 2009
Photo editing 2

Friday, 30 October 2009
Photo editing
Some of the photo's for my digital story are too bright as they were taken on a sunny day and my story is set on a day where it had been raining. I have edited these photo's to look more like a dull day.
Original photo:

I duplicated the background layer and turned off the visibility on the new layer.
I opened up the hue saturation tool and lowered both the saturation and the brightness.

I then turned on the visibility on the duplicate layer and changed the blending mode to pin light to allow the layers to blend together and crate a dull looking photo as if it was overcast.

As I had to do this to a few photos I recorded it as an action and used batch processing to repeat the action on several pictures quickly.
This makes the photo's look more realistic for a day where it has been raining and will communicate this in my film better.
I have also decided to edit all of my photographs in this way to stylise the film and give a feeling of continuation throughout it.
Wednesday, 14 October 2009
File conversion - audio

My sound recording was originally in the .amr mobile phone file format. This was not compatible with any of the programs available to me including Final Cut Pro, Garagband and iTunes. to convert this into the compatible .mp3 file formate I used the http://media-convert.com/ website. The file is uploaded to the website which then converts it and offers the converted file as a download. I was then able to work with the audio file in the programs I needed to use.
Wednesday, 7 October 2009
Light
This is the animatic and final animation for the Light animation. This shows how the animatic represents what is happening in the final but is not a finished and polished piece and has less movement in it. This is done as it is cost effective. These examples also show how an animation changes, more animatics would be produced to show these changes as they are requested by whoever is commissioning the animation, until a final animatic is agreed on to take to animation for final. Again this cuts the cost of producing final animation when changes may be made, it saves time as well as money.
Gorillaz Animatic
http://www.youtube.com/watch?v=xJmCWeyRlpo
Unfortunately the embed utility is disabled for the above video. However it is an animatic for the Gorillaz song Dare. This shows how an animatic is used to pitch an animation, without going to the cost of producing the animation before it possibly being turned down - which would be a loss. The animatic is simple but shows more movement then a story board, it is also set to the sound track used for the animation. This gives the viewer an idea of what the animation will look and move like. This animatic also introduces some colour, showing the night club like lights again giving the feel of the animation to the viewer. Animatics are supposed to be fairly cheap to produce as the animation is not necessarily going to be commissioned at this stage and fully animating would cost too much for the risk of a loss.
Tuesday, 22 September 2009
Honda Diesel Ad
Earlier I blogged about Nightmare Before Christmas and how that shows part of my personality. Well I feel that this represents another, contrasting part of my personality. I also really like colourful, bright things. Perhaps child-like at times. It shows the bubbly, friendly, somewhat outgoing side of my personality. Maybe I could some how use the juxtaposition between the two in my work.
Jamie Dean
I really like this stop motion animation. I love the old feel it has through the grey scale and jittery, achieved through the use of super 8 film. I would look at using filters and effects to recreate this style in my own work.
The items used within the film also add to the old look of it. I really like the simple animation and the jerking movement of the obejects. This reminds me of old childens stop motions such as Camberwick Green and Trumpton and could be recreated through playing with the frame rates and/or shooting fewer frames.
The animator has used focus settings to create parts of the animation that started out of focus and then focuses in. I like this effect, it is surreal and really adds to the effect of the film.
The music really adds to the effect of the dark feel of the film, the spacing between the bass and the treble within the song and the contrast within this. The slow, lingering tempo of the song adds to the creepy effect as well.
The overall feel of the short film is Gothic and Surreal. I really like this. Again it shows the side of my personality that really likes creepy, strange things.
Erica Russel
I really like this animation by Erica Rusell, the smooth movement and the complex dancing that they do is amazing. I also really like the way it becomes abstract, with simple shapes making up the human form.
The materials she has used seems to be pencil crayons or pastels, ink at times, graphic markers or similar and possibly some computer based animation at times.
I could perhaps use abstract shapes, and ideas to communicate meaning in my work. I can also look at experimenting with different materials to see what works.
Nightmare Before Christmas
I think that the smooth motion of the puppets is great, especially the spider like way that Jack moves, very creepily. I think that the way they achieve in stop motion is amazing, the skill and patients that it must take.
Zero the ghost dog is created through double exposure (source: the DVD extras for Nightmare), which is now something that we can do through computers and take for granted. I think it is great that they had the manual skill to create the effect, which looks so much more interesting then a computer generated effect may look.
I generally really like Tim Burton films, I love the dark feel to the films. The shadows, creepy figures and strange buildings. It all adds to the feel of the films. I think that this represents part of my personality, I love the strange, the horrific, and dark, creepy stories, images, films etc. This is something that could think about including in my work.
Stop motion puppets have been used to create this animation. Lip syncing is created using different puppet heads, which are replaced to create the mouth shapes of the vocal sounds. Many of these have to be used for each sound to create realistic, smooth motion between the vocal sounds. The puppets joints will have hinges or ball joins which you are able to move but are stiff enough to stay in place so that each small movement for every frame can be captured to create the smooth movement of the puppets.
Stop motion puppets have been used to create this animation. Lip syncing is created using different puppet heads, which are replaced to create the mouth shapes of the vocal sounds. Many of these have to be used for each sound to create realistic, smooth motion between the vocal sounds. The puppets joints will have hinges or ball joins which you are able to move but are stiff enough to stay in place so that each small movement for every frame can be captured to create the smooth movement of the puppets.
Friday, 18 September 2009
Slicing
Although I have done some web design in the past no one has shown me how to slice. I'm please to say it's actually pretty easy! Here is the tutorial I followed:

Create guideline where you want the slices to be.

Use the slices tool to convert guides to slices. Then combine the slices that you want to merge. Then save for web.

Ta-da finished website in Safari :).
Web design research
This year I am doing web design as a module at college. The first brief is to create a personal portfolio site (...finally I can upload something that will impress universities, designers, agencies etc rather then on that just serves it's purpose!)
I am starting my research into what makes a good design.
The first website that I looked at is http://vermeersch.ca/

The website is based around a 1:1 ratio picture of the artist. You navigate around the website using the buttons at the bottom, which then make you travel around his body to find out different navigation. The website is simple and easy to navigate as the navigation is always visible as the bottom of the screen. It is clean and easy to take in and navigate around. The idea is strong, the artist says that he puts a lot of himself into his work which is why he has created the site as he has, creating a strong idea for the basis of the website.
There is also an explore option in the navigation bar that allows you to look around the site freely.
The portfolio section of the website is displayed in this box, with its own navigation for the projects. Each link causes the box to move to a different part of his body - so that you explore the whole of his body. As you hover over it the information about the project is displayed at the bottom of the box.
Overall the website is simple to navigate, clean, clear and serves it's purpose.
The limitations of the site is that it could easily become cluttered if more content needed to be added. Also it is slow to load on slower connections, over my broad band wi fi at home it took considerably longer then on the wired network at college. However the target audience for the website are more likely to be people working in offices with faster internet connections on wired networks, making the loading faster. The final limitation is that some of the links to his work are now dead, this looks unprofessional and is something that I would need to keep on top of on my website if I was linking to externally hosted projects.
Representing myself with my website is something that I should consider with my website, to show universities and potential clients who I am. Also a simple navigation system is useful for users of a website, meaning that they would be more likely to want to use the website.
Representing myself with my website is something that I should consider with my website, to show universities and potential clients who I am. Also a simple navigation system is useful for users of a website, meaning that they would be more likely to want to use the website.
I have also looked at http://positivehype.com/

I really like the design of this site, the bright colours on the dark background. I would really like to create something like that. I think that it shows my personality, with my friendly, bubbly side in juxtaposition with my like of darker films, stories, myths, imagery etc.
This front page is clean, simple and easy to navigate. Everything fits in the browser screen, meaning that you ca take everything in easily.
On their "our work" and "blog" pages the navigation bar disappears which is annoying as you have to go back to the original site to be able to navigate to other pages. This is poor design, the navigation should provide a continuation between pages for consistency and also ease. I fell that people are going to find this frustrating and are less likely to want to use the website. I will need to make sure that my navigation is easy to use and consistent for my website users.
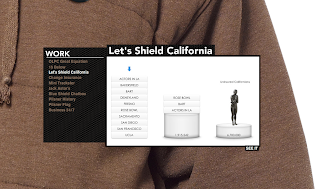
http://equation.laptop.org/

This is the website for a charity that believes that a lot of the worlds problems are down to education, and that the solution is for every child to have a laptop to support their education. This is a simple campaign website asking for people to become part of the equation for change. You can add yourself to the chain, selecting your colour, name and equation that you would like to add. The scrolling is simple, just move the mouse left or right and the chain scrolls through, it also animates up and down as a chain and plays a musical note.
You can then click on one of the icons to load up a box with information in. I really like this idea, it is something that I would like to use for my portfolio, however I am not sure if it would be practical. For one it would be hard for people to tell what is going to load what in my portfolio (although perhaps I could get around this with different icons for web design, illustration etc and captions explaining what they are). It is also hard to accurately click on the different icons to load the information you want. This could be helped with larger icons and slower scrolling.
http://www.dinghyinsurance.com/

http://www.karimzariffa.com/

I really like this website, which centres around a simple, clean menu bar which floats in the centre of the screen. The layout is clean and easy to take in, the large text is easy to read.

As you click on each of the menu items they unfold upwards until you are focused on the top box. From there you can click on the lower box to scroll down, or in the grey area to zoom back out to use the menu bar again.

I feel that the simple, clean design really works. The website is easy to navigate and find your way around. Using one page helps people to be away of the orientation of different items.
For my design I could look at a simplified, clean navigation system to make it easy for a viewer to look around.
http://www.havenworks.com/

This website is awful. The designer as clearly put very little thought into the design. This is shown in a few ways. Firstly the website doesn't fit on the screen horizontally (and I am using the standared 1280 by 800 resolution) and vertically you need to scroll a long way. Secondly there is far to much information on the page. The eye is unable to take it all in and the information gets lost on the page. I don't think a visitor to the website would know where to start with taking in the information, and you are likely to miss the information you are looking for. Poor layout adds to this with far to many columns on the page. Too many colours have been used, including colours that clash. Again this makes it hard to find and take in the information on the page, as it causes a conflict for the eye.
http://equation.laptop.org/

This is the website for a charity that believes that a lot of the worlds problems are down to education, and that the solution is for every child to have a laptop to support their education. This is a simple campaign website asking for people to become part of the equation for change. You can add yourself to the chain, selecting your colour, name and equation that you would like to add. The scrolling is simple, just move the mouse left or right and the chain scrolls through, it also animates up and down as a chain and plays a musical note.
You can then click on one of the icons to load up a box with information in. I really like this idea, it is something that I would like to use for my portfolio, however I am not sure if it would be practical. For one it would be hard for people to tell what is going to load what in my portfolio (although perhaps I could get around this with different icons for web design, illustration etc and captions explaining what they are). It is also hard to accurately click on the different icons to load the information you want. This could be helped with larger icons and slower scrolling.
http://www.dinghyinsurance.com/

The web design for this site is awful, to the point where I am struggling to find anything nice to say about it. And I have no idea where to start criticising, so I will just go for it. Firstly the links are the same colour as the background colour, this makes them hard to read, and would be impossible for people some people to read. The website is not very accessible. Secondly a lot of the text is underlined, meaning that it is easily confused as being a hyper-link. This is annoying when you go to click on this text. The three images, which I can only assume, should be in line with one another are not. They also cause conflict for the eye as they are all brightly, coloured competing for your attention. The colour also clashes with the rest of the website. No consideration has been given to composition.
Basically the only thing that I can take from this to make my design better is to avoid all of the mistakes made by the designer(s).
http://www.karimzariffa.com/


I feel that the simple, clean design really works. The website is easy to navigate and find your way around. Using one page helps people to be away of the orientation of different items.
For my design I could look at a simplified, clean navigation system to make it easy for a viewer to look around.
http://www.havenworks.com/

This website is awful. The designer as clearly put very little thought into the design. This is shown in a few ways. Firstly the website doesn't fit on the screen horizontally (and I am using the standared 1280 by 800 resolution) and vertically you need to scroll a long way. Secondly there is far to much information on the page. The eye is unable to take it all in and the information gets lost on the page. I don't think a visitor to the website would know where to start with taking in the information, and you are likely to miss the information you are looking for. Poor layout adds to this with far to many columns on the page. Too many colours have been used, including colours that clash. Again this makes it hard to find and take in the information on the page, as it causes a conflict for the eye.
Thursday, 17 September 2009
Lightwave
I have had my first 3D modeling & animation lesson today. We need to research, develop and create our own world of the future using the Lightwave software. I have come up with an initial idea which is actually drawn from an activity I did in a science lesson about 5 years ago in Year 9. We had to create a way for humans to live on another planet as the world was being destroyed. My idea was to build a large dome on the moon and use large air tanks to supply the air until a self sustaining environment was created, through the growth of plants. I am using this as my starting point and initial idea and developing it further from there.
Here is my first design sheet, it isn't very big because the college scanners are not working so I have had to take a picture on my phone (5MP so decent size) but then send it to Wordpress (as blogger doesn't have a UK mobile utility) and then save it to upload it. My life story over, that's why it is only a small image.
I have started to look at a couple of different ideas for developing the design.

I am quite excited about this project. I am now off to do more research!
Wednesday, 16 September 2009
Brecht Follow Up
This is part of a documentary, you can see clips from his plays - as directed by him and see some of the techniques "in action" also his wife and others that worked with him and in his theatre. Talking about the man and his techniques etc
This is from Antigone as adapted by Brecht (originally by Sophocles). It isn't in English but is a good example of getus and I think know being able to understand what is being said helps this to become more apparent.
Subscribe to:
Posts (Atom)

